 kasploosh.com
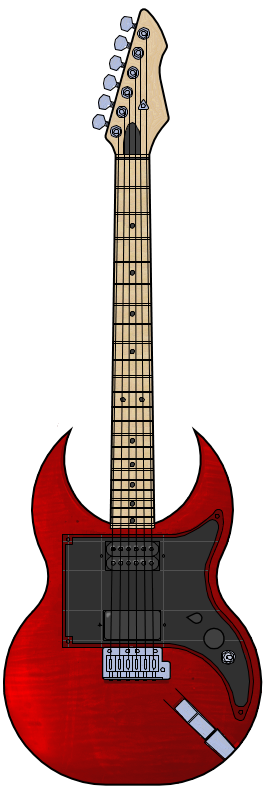
Electric Guitar - Part 1
2013-11-13
Part 1
When I was at Clemson, in 1997 or so, I decided I would “build an electric guitar”. We had a great woodshop at school and I hoped I could squeeze in this guitar project between school work without bothering anybody.
Donor Guitar
Peavey Patriot with Tremolo, not properly set up
body stamped 1987-10-17
My plan was to get a donor guitar, so that I would have a working basis for the project, and then just replace parts as I saw fit. I wanted to build the body, pickguard, and electronics, but planned to reuse the neck and hardware.
I bought a donor guitar through a classified ad in the newspaper. I still remember the guy I bought it from. I told him about my plans for a project guitar. He seemed to prefer that it be left whole and played as is, as a starter guitar. But being a donor is not the worst thing.
For $80 I got a USA-made, CNC, simple Peavey "Patriot with Tremolo" from 1987. This was a good basis for the project.
The solid maple neck, tuning keys, bridge, and tremolo have been in every phase of the project. Thanks to Peavey and the guy who sold me this guitar.
First Body
This illustrates the circles used in the body design.
I went to a seller of hardwoods near my house, and asked if they might have something suitable for a guitar. I listed some woods that might be good. They sold me a big chunk of curly maple (13 inches wide, 24 inches long, and 1.95 inches thick). It was wide enough, long enough, and thick enough to make a whole body just by carving, so that’s what I did. I have been paying the price (in weight) of this solid maple body ever since.
I brainstormed the shape of the body. I liked the double horns of a Gibson SG, but I wanted the horns to be more dangerous, and I wanted the body to be bigger. While playing around with ways to define a guitar body using simple geometry, I came up the plan to use a series of circles as the basis for the design.
The illustration at left shows the circles that define the design. The three magenta circles are all the same size. The size and spacing of these three circles is what defines the overall aspect of the guitar. I spread them out to create a pleasing shape.
The green circle was sized to make the best looking horns. The start of the neck touches the green circle.
All of the circles are laid out from the central axis, represented by the cyan line.
If I had this project to do over, I would do something with more straight lines, less curvy. But as for something that my college self gifted to me, this is not too bad.
I cut the maple slab to approximate size with a band saw, and then sanded it to final size with a spindle sander and disc sander.
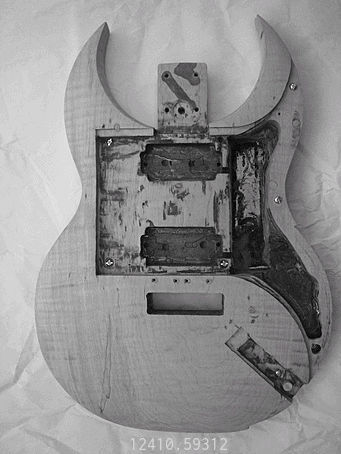
I routed out the electronics cavity using a plunge router. On more than one occasion, I messed up when the router bit loosened and went deeper than planned. But, I did get all the main cavities made at this time.
Extra Routings
In my youthful way, I wanted to add “extra features”, and somehow I got the idea to route the guitar cable through the bottom edge of the guitar.
To make this happen, I routed out a big chunk of the bottom edge of the body, big enough to fit a curved steel channel that I welded. A guitar cable could be pushed up into this steel channel.
In the face of the body, I cut another channel. This held a hasp. When closed, the hasp tightened down on the guitar cable in the channel.
This was one of the dumbest things ever added to a guitar. The hardware has long since been discarded, but the routings in the face and edge remain.
First Finish
I dyed it red with aniline dye. The red was a strong color that could bring out the interest in the curly maple. But the topcoat I applied was too plasticky, and the body wound up looking like a candy apple.
First Wiring
I went to a local music store and bought a humbucker pickup. This came with some basic wiring diagrams. I also used the existing pickup from the Peavy Patriot to make a double-humbucker guitar. I chose one of the wiring diagrams from the instructions to connect the two pickups. I think at this point I re-used some jacks, switches, and pots from the original Peavy Patriot.
The pickguard at this time was 1/4" clear acrylic. I thought that would look neat (it didn’t). The acrylic was recessed into the body. I also added scratch lines across the face of the acrylic, to demonstrate the geometry that was used. These scratch lines did not look good on the final product.
Phase One Dissatisfaction
Let me list the problems with the first phase:
- Playability—The body had been cut to an outline, and the edges eased, but largely it had not been shaped. Imagine strumming a guitar where the corner under your arm has not been beveled. It was not comfortable to play.
- Finish appearance—I think the red dye I had used was striking and attractive, but whatever topcoat (polyurethane?) had made it worse. Less brilliant, more mundane. And too much of one color: red, red, red.
- Scratch lines—I had put purposeful scratches on the face of the clear acrylic pickguard, like we did for hand-drawn architectural plans. This was not a good look for a guitar.
- Color scheme—I had coated the interior of the electronics cavity with a electromagnetic-shielding paint. Not a terrible idea, but it made the interior cavity black. And so the transparent pickguard showed off a black cavity. The overall look was red and black, not red and clear as I imagined.
- Weight—It was heavy. The solid maple body (minimally shaped) and steel cable routing hardware made this one excessively heavy.